Using a Self-Threading Needle
Steps for Threading a Needle Successfully
First, here are some general hints and organization tips for easier needle threading and sewing:
Before starting any sewing project, organize your sewing materials on a tray with a raised edge or lip. You can cover the surface with a contrasting placement or use a flat, rubberized mat or jar opener that provides extra traction and stability for your needle threading materials.
- If you have low vision, ensure the lighting in your sewing area provides sufficient illumination. You can read more about lighting at Lighting and Glare.
- When you purchase thread, ask the store clerk to release the thread end on each new spool.
- Use thread locks to keep the ends of threads from tangling. A thread lock is a small plastic disc that snaps into the hole on the end of a spool of thread and keeps the thread end securely in place. You can purchase thread locks at most sewing supply stores.
- Store your thread and matching bobbin in a small Ziploc bag or baby food jar with a label (large print or tactual) that identifies the color.
- Try using two pincushions: Use one on your wrist and place the other on your work surface or in your working area.
- Keep a refrigerator magnet nearby to help you locate dropped pins. You can also run it over the floor of your sewing area before you vacuum.
- A magnetic pincushion can make it easier to collect your pins and needles in one place and keep them accessible.
- And speaking of dropped pins, don’t sew barefoot or wear thin socks or slippers. Fallen pins can cause foot injuries, especially if you have diabetes and/or reduced foot sensation.
- You can also use pre-threaded needles. They are available in various packs containing either multiple thread colors or white and black thread only.
Hint: Coat your thread with beeswax (available in most sewing and craft stores) to prevent it from breaking and splitting.
- Keep your scissors on a chain or a ribbon that you can place around your neck.

Threading Your Needle
There are several different ways to thread a needle if you are blind or have low vision:
Use Self-Threading or Easy-Thread Needles:
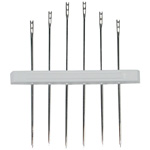 These needles are available at most sewing supply stores or through specialty catalogs. They are all-purpose needles, available in assorted sizes, with a tiny “V”-shaped slot directly above the eye. To thread the needle, you must stretch the thread across the slot and pull it down into the eye.
Some advantages of self-threading needles:
- They are inexpensive and readily available.
- Self-threading needles are familiar to most people who do hand sewing.
Some disadvantages of self-threading needles:
- They can come unthreaded while sewing if the thread is pulled with too much force.
- Some types of thread can become frayed during the threading process.
- The needle has to be stabilized throughout the threading process.
Before you begin:
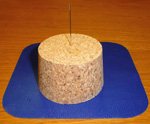
- Assemble a self-threading needle, thread, pincushion, a stabilizer for the needle (a cork or bar of soap), scissors, and a tray to work on.
- Take a few moments to examine the self-threading needle. Try to find the “V”-shaped slot with your fingernail.
Here is a method for threading a self-threading needle:
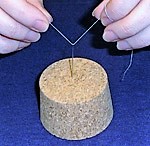
- Stabilize the needle by placing the pointed/sharp end down into a bar of soap or cork:
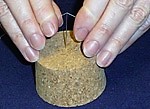
- Grasp the thread with both hands’ thumb and index fingers, leaving an inch or less free between your fingers. The thread should be taut but not pulled so tightly that it will break. (Note: Do not cut the thread at this point. Keep it connected to the spool since it is much easier to locate if it is still attached.)

- Using one of your index fingers as a guide, bring the taut thread to rest on the top of the needle:

- Lay the taut thread across the “V-shaped” notch that is located directly above the eye of the needle:
- To insert/lock the thread into the eye of the needle, use downward pressure to push the thread through the “V” notch and down into the eye of the needle directly below the notch:
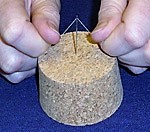
- Pull down firmly with both hands until you hear or feel the thread “click,” or “shift,” or “lock” into place.
- As soon as you hear or feel the thread, “click,” “shift,” or “lock,” stop pushing the thread downward, or it may break. Your needle will now be threaded.
- To test if the needle is threaded, lift the thread slightly to determine if it is secured within the eye of the needle. You will feel a slight resistance if it is adequately threaded:
- You can now cut the thread, severing it from the spool. Finish by making a knot of your choice.
By Maureen A. Duffy, M.S., CVRT