Using a “Witch” Needle Threader
Hints and organization tips for easier needle threading and sewing:
- Before starting any sewing project, try to organize your sewing materials on a tray with a raised edge or lip. You can cover the surface with a contrasting placement or use a flat, rubberized mat or jar opener that provides extra traction and stability for your needle threading materials.
- If you have low vision, make sure that the lighting in your sewing area provides sufficient illumination.
- When you purchase thread, ask the store clerk to release the thread end on each new spool.
- Use thread locks to keep the ends of threads from tangling. A thread lock is a small plastic disc that snaps into the hole on the end of a spool of thread and keeps the thread end securely in place. You can purchase thread locks at most sewing supply stores.
- Store your thread and matching bobbin in a small Ziploc bag or baby food jar with a label (large print or tactual) that identifies the color.
- Try using two pincushions: Use one on your wrist and place the other on your work surface or in your working area.
- Keep a refrigerator magnet nearby to help you locate dropped pins. You can also run it over the floor of your sewing area before you vacuum.
- A magnetic pincushion can make it easier to collect your pins and needles in one place and keep them accessible.
- And speaking of dropped pins, don’t sew barefoot or when wearing thin socks or slippers. Fallen pins can cause foot injuries, especially if you have diabetes and/or reduced sensation in your feet.
- You can also use pre-threaded needles. They are available in variety packs that contain either multiple thread colors or white and black thread only.
- Hint: Coat your thread with beeswax (available in most sewing and craft stores) to prevent it from breaking and splitting.
- Keep your scissors on a chain or a ribbon that you can place around your neck.
Use a Hexe or “Witch” Needle Threader:
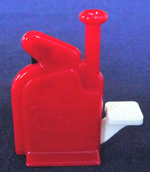
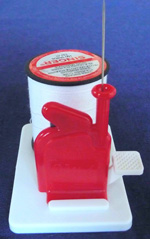
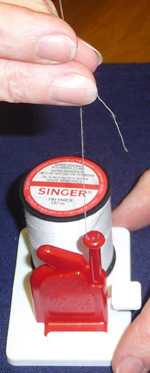
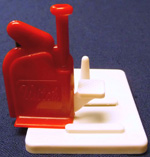 The Hexe (also called the Witch) is a small, brightly colored plastic device that holds the needle upright and pushes the thread through the eye of the needle.
Some advantages of the Hexe or Witch:
- It is inexpensive.
- The red threader provides good color contrast for people with low vision.
- It holds the thread securely on a built-in spool holder.
- It also has a built-in thread cutter.
- It works equally well for right- and left-handed users.
Some disadvantages of the Hexe or Witch:
- It can be difficult to find in regular sewing supply stores.
- It requires good finger sensitivity and manual dexterity.
- It contains several small parts that can break or bend easily.
- The device can malfunction and miss the eye of the needle.
- It does not work well with very small or very large needle eyes. A medium-sized needle works best.
Before you begin:
- Assemble the Hexe/Witch threader, needle, thread, pincushion, scissors, a tray to work on and a flat, rubberized non-skid mat or jar opener that provides stability and traction for the threader.
- Remove all parts from the box and place them on your tray.
- Set the box and the instruction sheet aside.
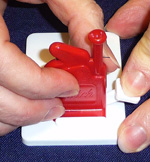
- Take a few moments to examine the Hexe/Witch with your fingers.
- It has two main parts: (a) a white rectangular base that contains a pointed spool holder and (b) a red threading unit that contains a square pedal, a “funnel” to hold the needle, a thread cutter located beneath the “hump,” and a small “groove” located between the funnel and the thread cutter.

Hexe White Base |
Hexe Threading Unit |
- Try to find the groove with your thumbnail.
Here is a method for threading a needle with a Hexe or Witch threader:
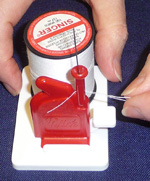
First, assemble the two main parts of the threader:
- Hold the white rectangular base so that the pointed spool holder is away from you and set it down on your tray.
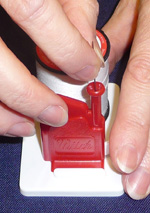
- Hold the red threading unit in your left hand, with the funnel facing upward and the square pedal to the right.
- With your right hand, locate the two tracks on the base. The tracks should go from left to right and be parallel with the edge of your tray or table.
- Slide the threading unit from left to right, between the two tracks, until it stops.

Next, examine the red threading unit and the threading mechanism:
- While pressing the pedal down gently, use your other hand to locate the thin metal blade or “foot” that protrudes from the funnel, just above the pedal.
- This blade or “foot” is the mechanism that will push the thread through the eye of the needle.
- When you remove your finger from the pedal, notice that the foot pulls back inside the funnel.
- Now you’re ready to thread your needle!
Threading the needle:
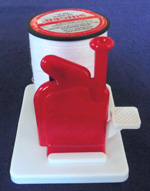
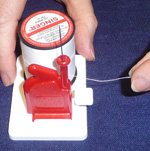
- Place the spool of thread on to the pointed spool holder.
- Insert the needle into the funnel with the sharp/pointed end up. You can place a small piece of Styrofoam packing material on the point of the needle to protect you from scratches or injury.
- Check to make sure that the needle is inserted correctly by trying to lift the needle with one hand while pressing down on the pedal with the other. If the needle is inserted correctly, you will not be able to lift it out of the funnel.
- If you can lift the needle, rotate it slightly (a quarter turn will be sufficient), press down on the pedal, and try to lift the needle out again. Repeat this sequence until the needle remains securely in place and you cannot lift it out of the funnel. This will ensure that the needle is in the correct position for threading.
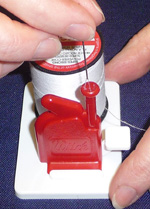
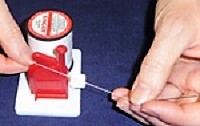
- Locate the end of the thread and drape a few inches (no more is necessary!) across the groove. (Note: Do not cut the thread at this point. Keep it connected to the spool, since it is much easier to locate if it is still attached.)
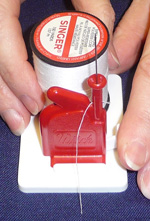
- Press down on the pedal.
- While holding the pedal down, use your other hand to locate the thin metal blade or “foot” that has pushed a small “loop” of thread through the eye of the needle. The metal “foot” and the thread “loop” are now both protruding through the funnel just above the pedal.
- Pinch the metal “foot” and the thread “loop” between your thumb and index finger and pull your fingers away from the threading unit. You will now be holding the thread between your fingers.
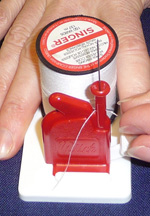
- Release the pedal.
- Keep pulling the thread until the end is free of the threading unit. Let go of the thread end.
- Hold the tip of the needle between your thumb and index finger and lift it out of the funnel. As you continue to lift the needle, slide your fingers down to hold it securely by the eye; otherwise, your needle will come unthreaded as you lift.
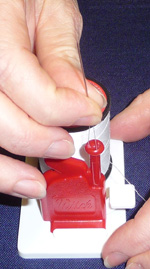
- Continue lifting the needle until the shorter end of the thread is free.
- Your needle will now be threaded!
- Join the shorter end of the thread with the strand that is still attached to the spool and pull out approximately 18 inches. You can gauge 18 inches by measuring the distance from your fingertips to your elbow.
- Pull both strands into the thread cutter, severing the thread from the spool.
- Finish by making a knot of your choice.
Sewing Machine Needles
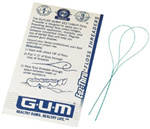
Butler Dental Floss |
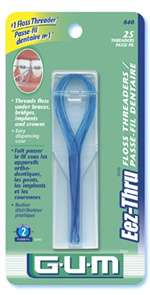
Butler Floss Threader |
To thread a sewing machine needle (or a regular eye needle), try using a Butler Dental Floss threader. This product is available at your local drugstore or where denture cleaning supplies are sold. A Butler Dental Floss threader is a flexible loop of thin nylon plastic connected to a long flexible tail.
Here is a method for threading a sewing machine needle with a Butler Dental Floss threader:
- Take the tail end of the Butler Dental Floss threader in one hand.
- Place a finger of the other hand behind the eye of needle.
- Bring the tail end of the threader toward the eye of the needle.
- Push the tail through the eye, placing your finger behind the eye to feel the threader coming through. Do not push the flexible loop through yet.
- Remove your fingers and let go of the threader. It will remain in place and “hang” from the eye of the needle.
- Take a piece of thread.
- Keep the piece of thread attached to the spool and make a very small knot in the loose end.
- Feed the knot through the nylon loop of the threader.
- Continue to pull the remainder of the threader, loop, and thread through the eye of the needle.
- Your needle will be threaded.
By Maureen A. Duffy, M.S., CVRT