Drilling Holes
Using a drill to place the hole exactly where you want it is a basic – and essential – skill for most woodworking projects. This guide will describe various tools that can be used for drilling and discuss several techniques that persons who are blind or have reduced vision have found to be effective.
Drilling pilot holes in wood before inserting nails or wood screws, drilling a hole for a bolt, and pinning boards together with wooden dowels are some examples of the importance of using a drill in woodworking or home repair projects.
Tip: Drilling pilot holes slightly smaller in diameter than the nail you plan to use can keep boards from cracking or splitting.
Tip: Drilling a pilot hole slightly larger in diameter than the wood screw you want to use through the top board will make driving it in easier and avoid cracking the top board.
After some experience, visually impaired woodworkers often find they can get the drill very close to a right angle by running their fingers up and down the bit when it is not turning, enabling them to drill a hole straight into the workpiece. Maintaining your body stable can help hold the drill at 90 degrees to the work surface.
Safety Practices for Drilling
- Consider the steps you will need to take to complete the project.
- Select the tools and materials you will need.
- Keep your work area organized and free of clutter.
- Wear safety glasses, closed-toe shoes, and snugly-fitting clothing to prevent your sleeves from getting caught up in your work.
- Place the tools and hardware you will need for your task in a nearby tool tray, tool belt, or other container so they are readily available to you.
- Keep unneeded tools and materials placed elsewhere, away from the work area.
- Do not begin a project if you are tired, frustrated, or have been consuming alcohol.
You can find additional safety and organization tips at Home Repairs Safety and Preparation Checklist and Organizing Your Workshop Area.
Tools for Drilling Holes
Drilling holes requires a tool to make the hole, called a “bit,” and a tool to “force” the bit into or through the wood. Many projects can be accomplished with bits ranging from 1/16 inch to ½ inch in diameter. They can be purchased separately or in sets. Larger diameter bits are also available.
Brace & Bit Drill
Originally, carpenters and craftspeople drilled holes by hand using a “brace and bit.” The brace, which is approximately one foot long, has a chuck on one end to hold the bit securely and a knob (or grip) on the other end to enable the carpenter or craftsperson to apply pressure to drive the bit into the wood.
The middle part of the brace is offset, enabling the operator to turn the brace and bit around and around in a clockwise direction, thereby drilling the hole.
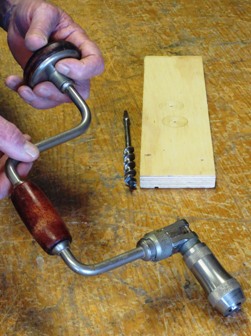
Brace with a knob/grip on one end
and a chuck on the other
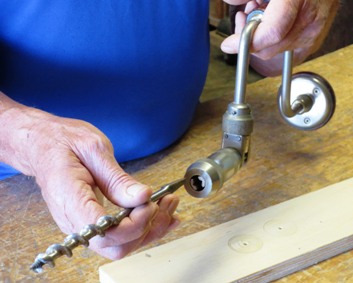
Brace with a bit inserted into the chuck
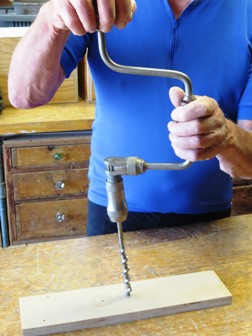
Drilling a hole with a brace and bit
Hand-Operated Drill
The brace and bit is seldom used now, but the same concept applies to drilling holes by hand using a hand-operated drill driver. The drill driver has a crank, which powers a gear mechanism, which turns the chuck and bit. This tool is fairly inexpensive and easy to use in tight working spaces.
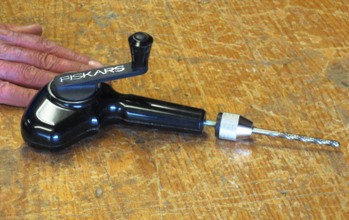
Hand-operated drill driver
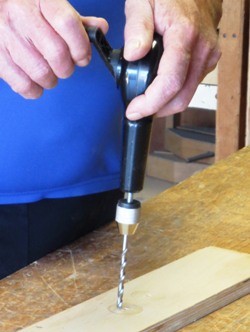
Drilling a hole with a hand-operated drill driver
Battery-Powered Cordless Drill Driver
Drills powered by electric motors became widely used many years ago, but they have been replaced in recent years by battery-powered cordless drill drivers. These battery-powered devices can also be used to drive in wood screws.
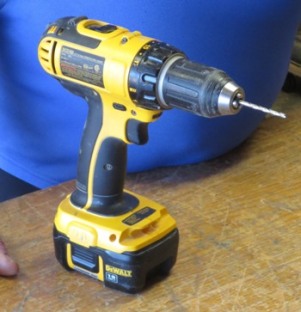
Battery-powered cordless drill
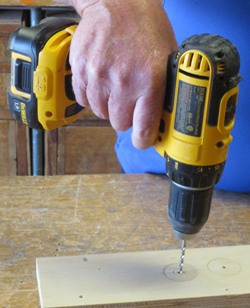
Drilling a hole with a battery-powered cordless drill
Drill Press
Some woodworkers invest in a drill press. The press can sit on a workbench, or larger models can sit on the floor. A steel column connects the base to the top of the press where the motor powers the chuck. The operator can use a geared mechanism to lower or raise the bit with a lever.
The piece to be drilled rests on a table attached to the vertical column. The advantage of a drill press is that you can drill holes exactly straight or at preset angles. By using a fence and stop block, you can repeatedly drill a hole in exactly the same location.
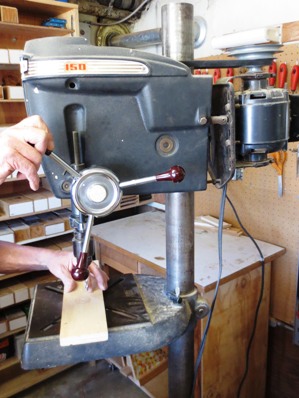
A drill press
Techniques for Drilling Holes
When drilling a hole using a hand or power drill, it can be tricky to drill the hole at a right angle to the work. Drills often have a level incorporated into the drill housing, but usually, this requires good vision to read.
There are, however, several techniques that persons with low vision or no vision use, which can make drilling quite accurate. These techniques include:
- Drill guides in various diameters are available from hardware stores or building supply centers. Placing the guide on the surface of the work to be drilled and inserting the bit through the guide makes it possible to drill a hole straight into the work.
- If you have access to a drill press, you can make a set of drill guides by drilling holes of different diameters into small wood blocks. These work just like the drill guides described above. If you don’t have access to a drill press, you might ask a sighted friend to make drill guides using a portable drill with a built-in level.
Tip:Over time, the guide hole in the wooden guide may become slightly enlarged, making it a bit more difficult to position the drill at exactly a 90-degree angle.
- Remove a square or rectangle of wood from a board, creating a right angle; then place the bit into the corner to help align the bit.
- Place a large-headed nail with the head down on the board’s surface, and align the bit with the nail by touch.
- Use an empty spool of thread or sewing machine bobbin (pictured below). Mark the spot by making a “start hole” with an awl, nail, or ice pick. Place the drill bit through the spool or bobbin and align the point of the bit with the start hole you’ve created. With the drill in the “off” position, place the flat end of the spool or bobbin firmly against the surface and hold it in place with pliers. Please note: Do not use your hands to hold the spool in place. With the drill and spool in this position, start the drill – and your hole will be straight/perpendicular to the surface.
- By Gil Johnson
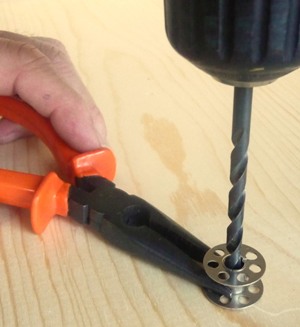
Sewing machine bobbin with a drill bit inserted
through the center hole in the bobbin
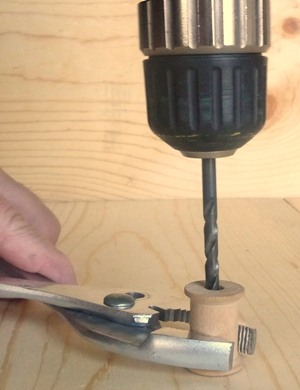
Wooden thread spool with a drill bit inserted
through the center hole in the spool